
Getting Started in Carrara
Introduction:
My name is Pnina Osguthorpe, also known as ArtPearl on some sites( Renderosity, Redbubble for example.)
My professional career involved scientific research in the field of computational Chemistry. This included some computer graphics, to visualize the structure of complex molecules and simulations of their dynamic behavior
My artistic activities have centered on watercolor painting. I started using CG applications such as Poser , Vue and Hexagon mainly to set up virtual models and scenes which are then painted in watercolor. However, with time I started creating CG images as a 'creation' on their own accord.
I am relatively new to Carrara and still learning the ropes. I am planning to make a serious of tutorials while I am still in the process of learning. Instead of the more common approach of 'Follow me, I know this road well. Trust me I'm an expert' I want to try the approach 'Walk with me, we will discover together what lies ahead' I'm hoping that the experience I gained from traditional art and from the other CG applications I learnt so far will help me navigate this journey without too many mishaps and make this a mutually beneficial experience.
As a first phase, to ease us into the Carrara experience, I want to go through the work flow with a simple project – we are going on a picnic! This will involve modeling some objects we need (starting with a picnic table) and texturing (shading) them. We will create the setting by modeling the terrain add some vegetation and a 'water feature', add some living creature(s) set the atmosphere and render our scene. Maybe even a short animation at the end of the picnic...
Hopefully we will return to some of these tasks later on and learn some more advanced or sophisticated ways to carry them out.
So lets start by getting acquainted with the user interface (UI) and some of the basic tools. This isn't an exhaustive description, I'm just touching on the features I think we will need most at these initial stages.
Initial Overview:
When you open Carrara you see very little:
A few menu commands on the top left, a few buttons on the top right, and a tray at the bottom. These are general tools which are always available.
(An extremely useful feature to tell or remind us what each tool does is that a short description of its function appears when the mouse hovers over it. )
In brief, the tools here are:
Menu: The commands in this section are similar to many other computer application.
-File – handles opening and closing documents(scenes).
-Edit – includes the actions undo, cut/paste, duplicate.
-Windows – controls which windows are visible/active and their size.
-Web – enables connections to the internet and plugins
-Help – opens the carrara manual
Buttons:
The first five buttons are the 5 rooms available in Carrara. Each room is dedicated to a particular type of task. (you can also enter the rooms by using the “Windows” command in the main menu)
Assemble: most of the work is done in this room, including organizing the various objects and lighting of the scene
Model: create objects
Storyboard: for setting up your animation
Texture: create edit and apply shaders to objects, defining how your objects look.
Render: create a two dimensional image(or set of images for an animation) of your scene.
The last three icons control the size of your window and closing the window.
Browser Tray:
This enables you to browse and load existing scenes, objects etc.
After starting to work on a scene and depending on the room you are in more commands/tools/trays will be enabled (not grayed) and some additional ones will appear.
Creating a Scene Document:
To get started we need to create a scene.
In the top menu chose File>New. (cmd+N)
We want a completely new scene so we chose 'empty scene' in the dialog window.
Now we have more tools available and a beginning of a scene in our main window. The main features we will use most in the next tutorials are labeled in the picture below.
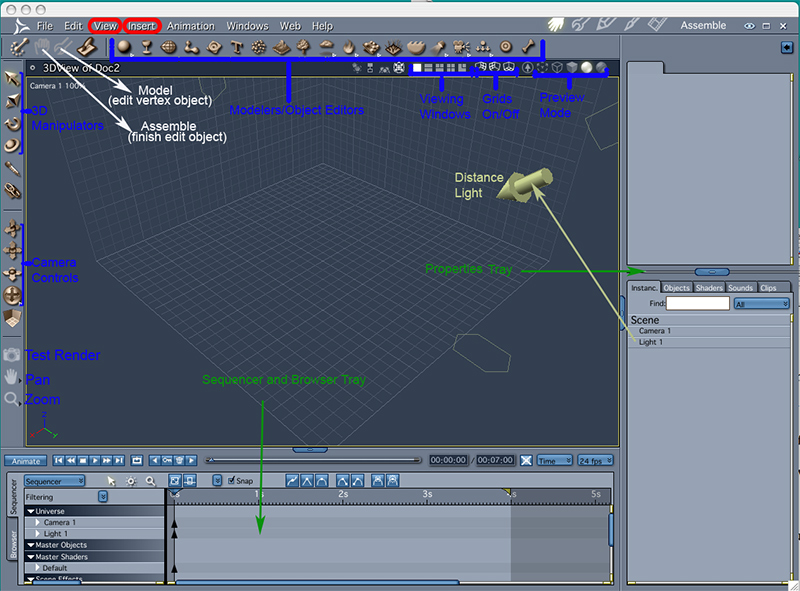
-New menu commands: view, insert (red)
-New set of buttons on the top -the assemble/model combination will be used when we want to modify objects inside the assemble room, in the context of the whole scene(white). The rest are the various modelers or object editors.(blue)
-In the row below these are viewing windows controls, to enable viewing of the scene from several directions, controls to display or undisplay the grids, and controls for the preview mode, ranging from the bounding box (simplest and quickest) to full texture (can be slow for complex shaders).
-New set of icons on the left side – object manipulation(more details when we add an object below), camera and active grid control.(blue). The camera controls include tracking in the various planes(top 3 icons and camera dolly pan and bank, as selected in the lowest icon. Keyboard short cuts exist for camera control, for example, Alt/option left button to dolly, Alt/option right button to pan. These are very useful but defer somewhat depending on the computer. In particular, as there is no 'right button' on the mac, you need to use Alt/option+CTRL to pan.
The test render icon is very useful for quick test of parts of the scene without going into the render room for a full render.
-Properties tray on the right (green) – the lower part includes the list of items in the scene, currently only a light and a camera.
-Sequencer and browser tabs in the bottom tray(green). The sequencer is used for animations. The browser is used to upload exiting presets – scenes, objects, etc.
Adding and Manipulating objects:
There are several ways to add an object to the scene. Examples:
Top menu Insert, select the required object from the popup list.
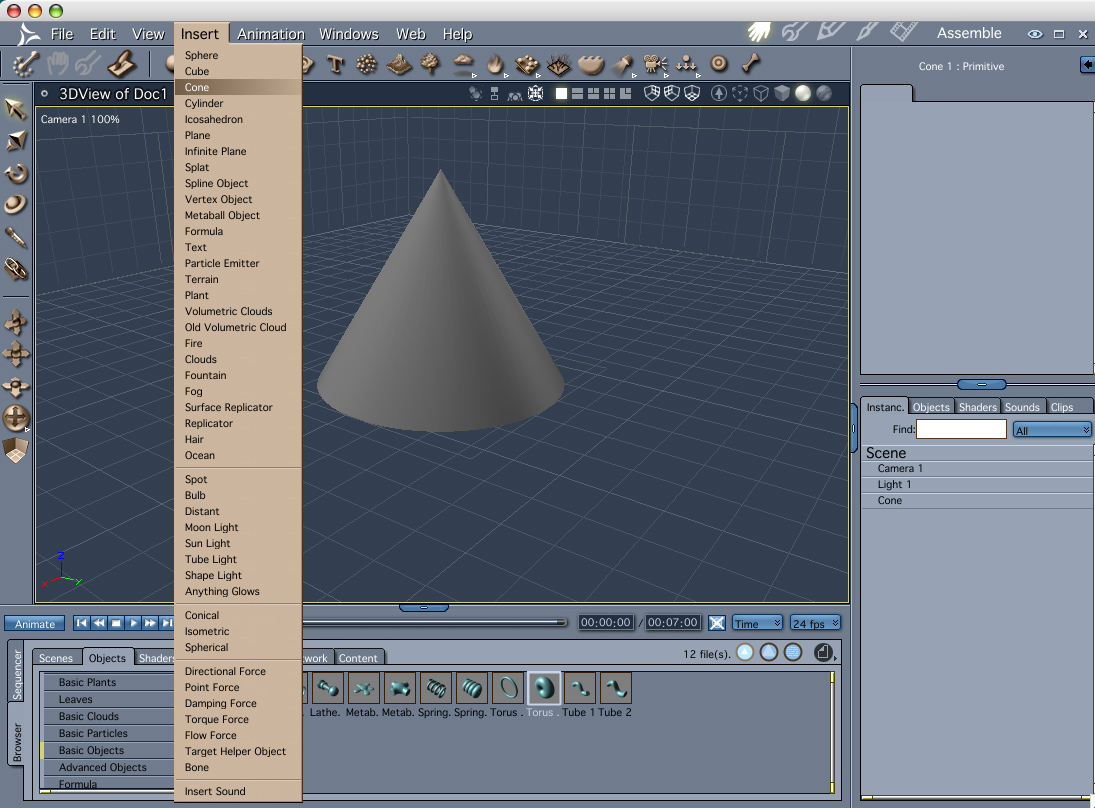
Top row modeling tools: Click the icon corresponding to the type required, chose an object from a popup list, if available for this type. Click in the window.
File>import browse to the location where you have the required object (can be from an external source like poser, more details later on)
Click on the browser tab(1) on the side of the sequencer/browser tray, then on the 'objects' tab(2) on the top. Select a category – eg'basic objects' (3) and click on the thumbnail of the object you want to insert(4). Drag into the scene window and release(5).
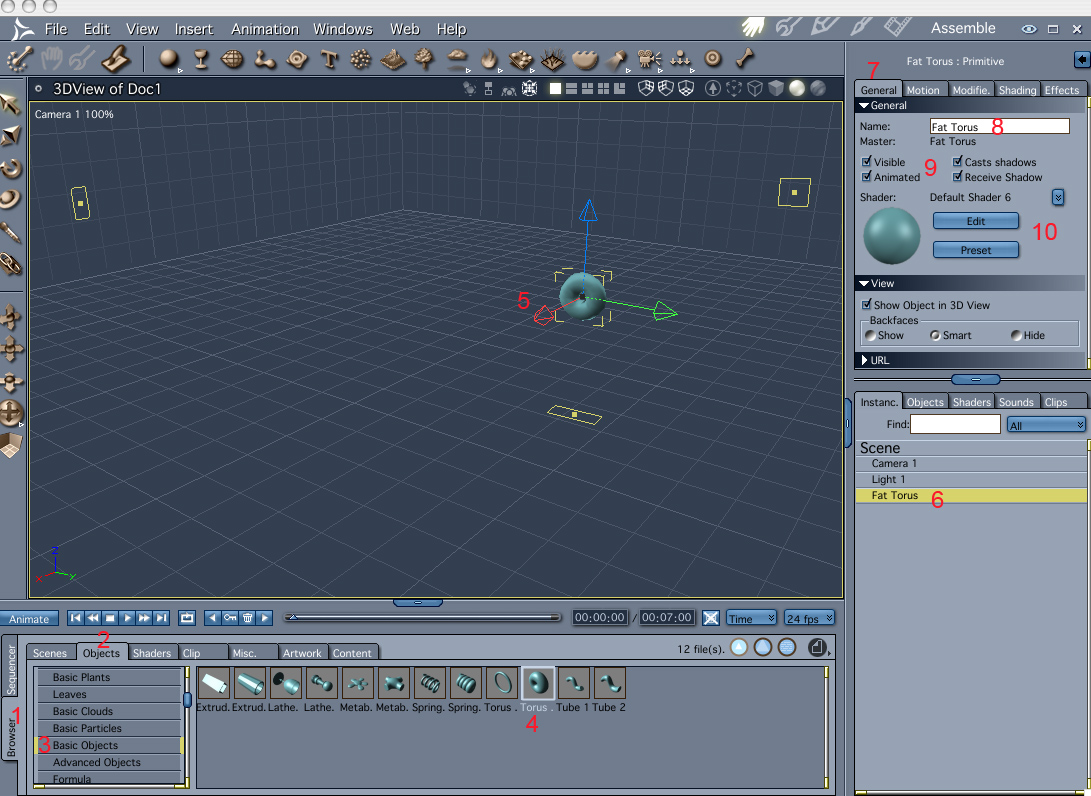
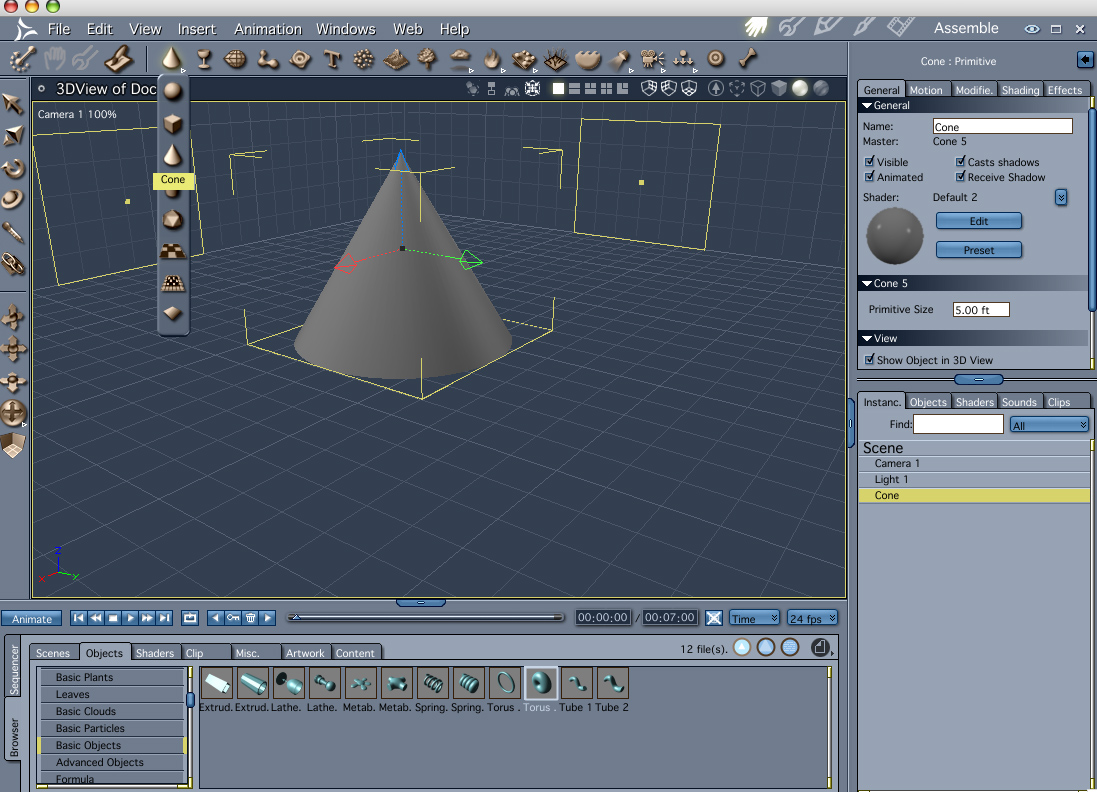
The object will appear in the scene window(5). Three projection outlines on the 3 grids will also appear. These are helpful guides to the 3d position of the object, which can otherwise be a bit misleading in a 2d view.
The name of the object will appear in the list in the lower part of the properties tray(6). Note that it appears in the list as an 'instance', in the tab by this name. We can have many items which look like a 'fat torus'. Each will be an instance of one fat-torus 'master object'. The different types of instances, the master objects, are listed under the 'objects' tab'. Manipulating an instance will apply just to this single item. Manipulating a master object will change all instances of this type.
The top part of the properties tray contains additional information with regard to this instance. In the general tab(7), we can type in another name for the instance(8), determine its visibility and shadow behavior(9). We can also modify its shader by clicking on the edit button or by selecting a preset
The object can be manipulated numerically in the 'motion' tab(1), transform panel(2) in this section of the properties tray.

We can chose if the transformation will be carried out in local or global coordinate system (3), and enter values for the position (4), rotation(5) and scale(6) of the object. These values can be relative to the center of the object(fixed) or a 'hot point' (can be moved within the object).
Numeric manipulation is a better method than using the manipulation tools below in situations when accurate size and locations are important. It is also useful when dealing with a very big scene if response gets sluggish
We can manipulate the object by using the object manipulation tools on the left.
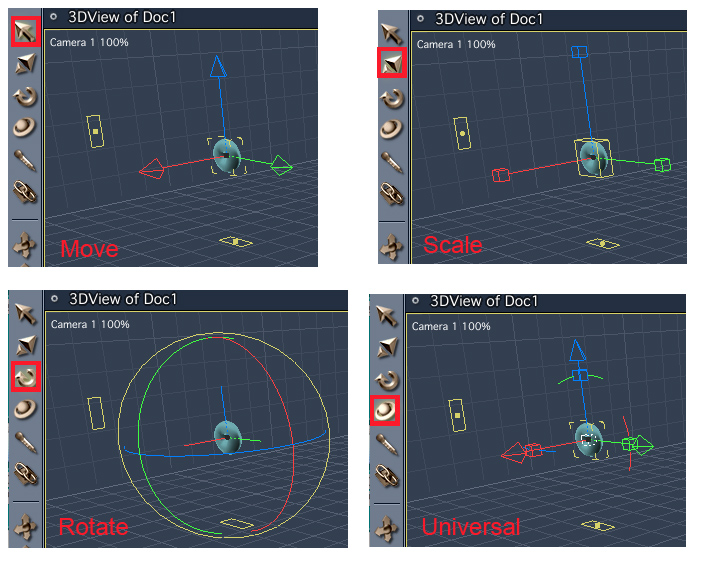
Click on the the top icon,move tool, 3 perpendicular arrows will appear, attached to the object, red, green and blue for x, y and z. Clicking and dragging an arrow will move the object in this direction. Clicking on the centre yellow cube and dragging will move the object in any direction
(Note that the direction of x,y,z is defined in the little diagram at the bottom left of the scene window)
Click the second icon, scale tool. The arrow heads are replaced by cubes. click/drag to scale in one direction. Click and drag central cube to scale in all directions keeping the proportions.
Click the third icon, rotate tool. Colored circles will appear. Click/dragging one to rotate around the correspondingly colored axis. Drag the yellow one for rotation in the 2d viewing plane.
The forth icon, universal tool has all the above abilities. Drag the arrow to move, drag the cubes to scale and drag the arcs to rotate. I will mostly use this tool.
Note that while we manipulate the object the projections on the grid planes change too.
We should now have enough information to start creating!
(Questions and suggestions are best e-mailed to Art.Pearls@yahoo.com)